3 GraphVis files Yes, I did solve some of the puzzles using GraphViz & a printer. 😃
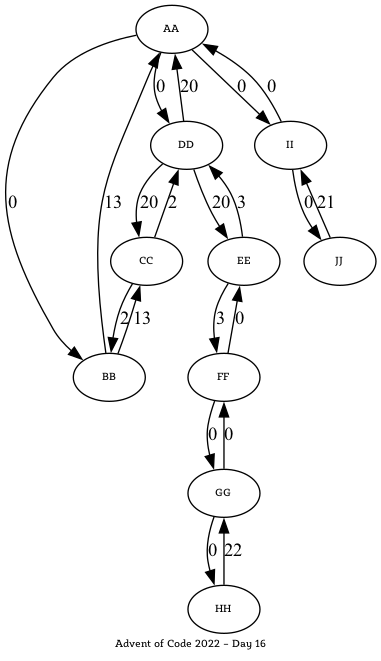
In some cases, I chose Graphviz to visualise the situation and support finding a solution to the puzzle at hand. Here’s an image for an example data set for one day in 2022:
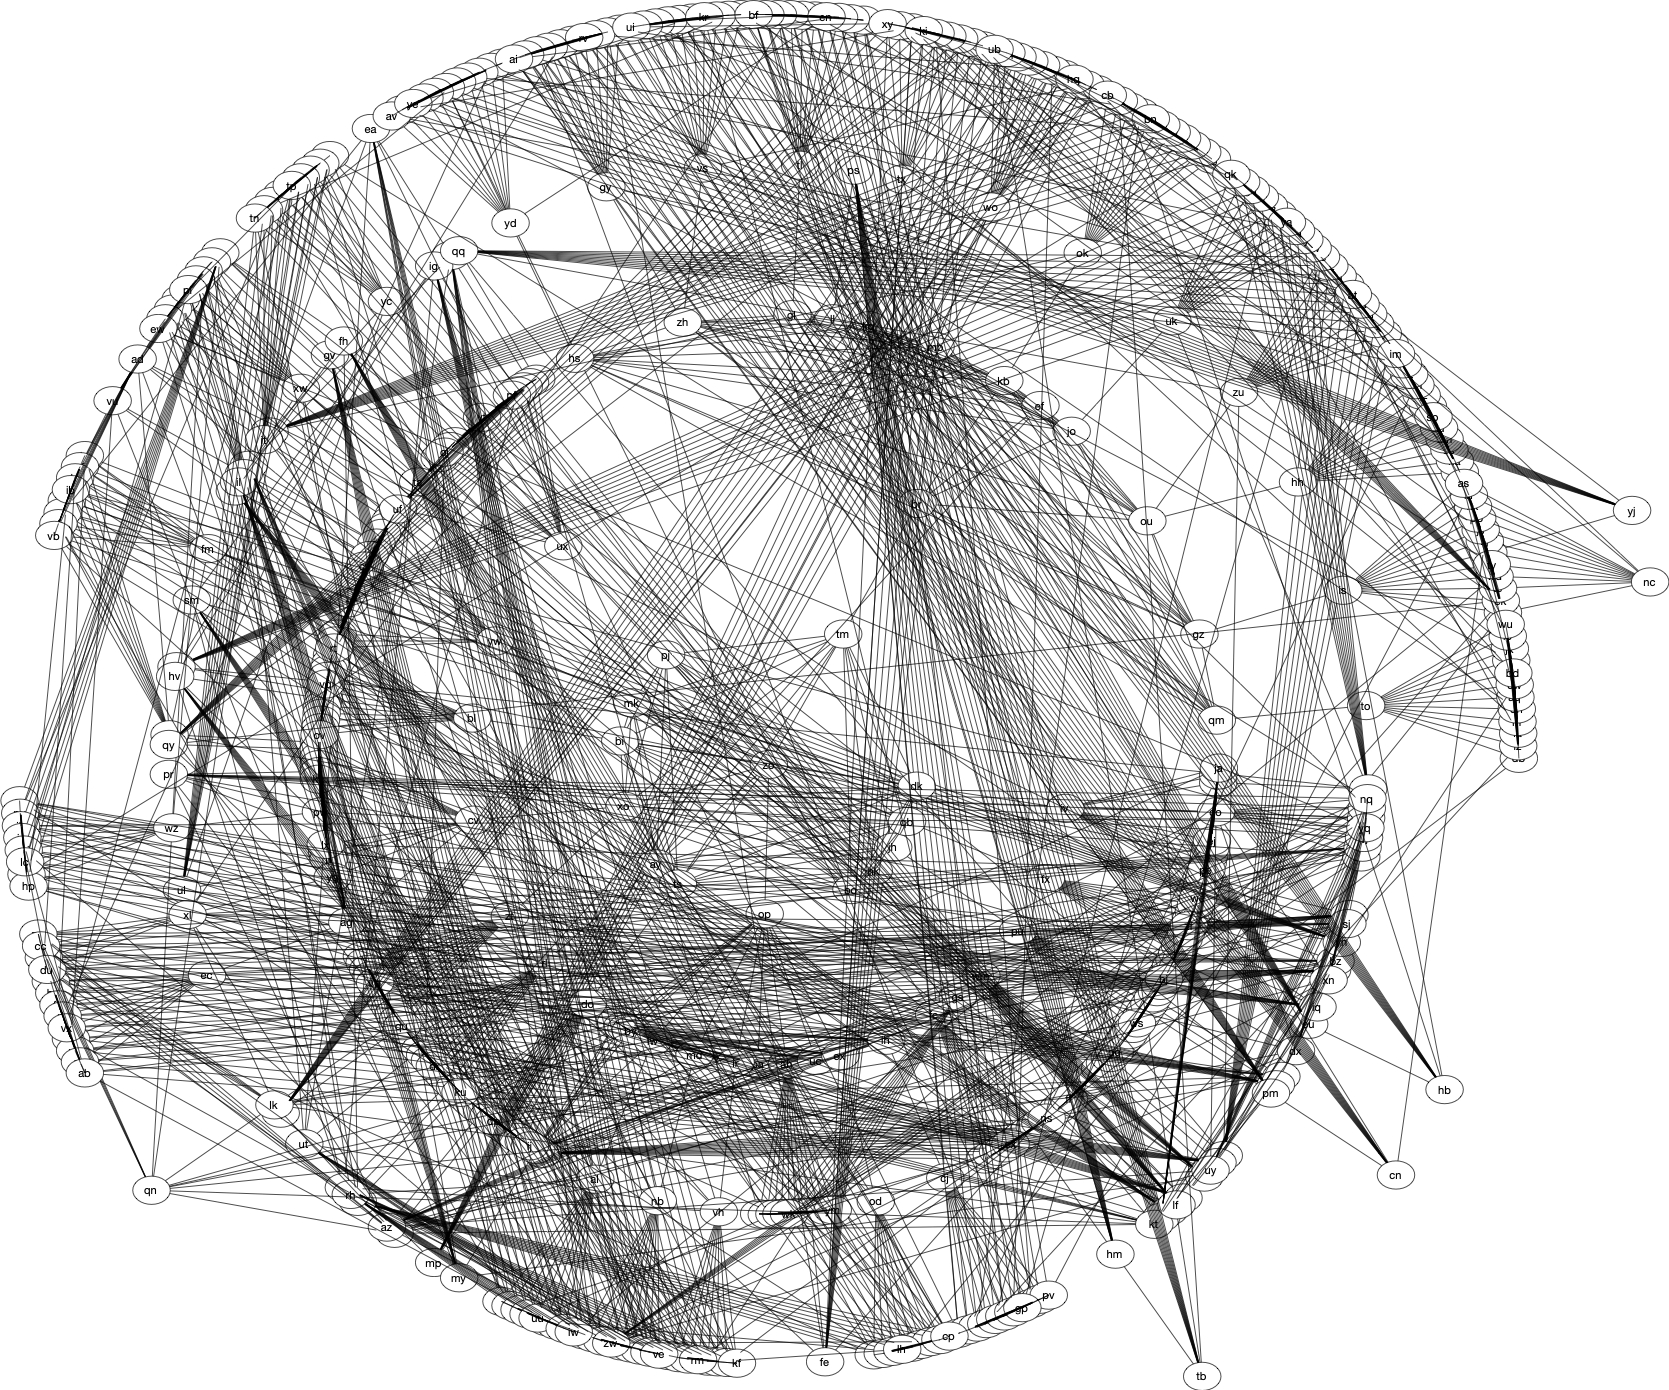
The full view of a complete input data set ()from another year was a bit more complicated:
One puzzle was about finding a Christmas tree, and this is how ‘mine’ looked like:
I’m already looking forward to another ‘Advent of Code’!
To illustrate the topic of a workshop I’m preparing, I wrote a small Rails (7.1.1) app that uses Tailwind CSS.
While preparing the application, I wanted to tailor the CSS of buttons, tables, etc. and wondered why the layout didn’t change when I edited the CSS classes of HTML elements. While the information about the formatting was present in the HTML displayed, it did not affect how the page looked.
Disclaimer: I am not suggesting to change the Ruby style guide.
At a workshop I was giving a few years ago, someone not used to writing Ruby code found an interesting way, that you can write Ruby code.
First let’s assume a class Thingy, that doesn’t do anything useful. It’s just needed to demonstrate the way to write Ruby.
Assume this is in file ‘thingy.rb’:
# frozen_string_literal: true

# Thingy is only used to demonstrate
# a way of writing Ruby code
class Thingy
  def initialize(*args)
    @args = args
  end

  def this(other)
    @args << other
    self
  end

  def that(*other)
    @args << other
    self
  end

  def content
    @args
  end
end
Now, let’s use this class in another script, that’s showing the alternative way to write Ruby code (in file use_thingy.rb):
Notice that rather LISP-like way to parenthesise, in line 7 in particular. I still am surprised that this is possible in Ruby and actually behaves the way I’d expect.
It’s also entertaining that Rubocop does not complain about this code:
> ls
thingy.rb     use_thingy.rb
> rubocop .
Inspecting 2 files
..

2 files inspected, no offenses detected
This is one of the reasons I like programming in Ruby so much: One can discover new ways (even if probably not very useful ones, sometimes) even after years of using it.
In preparation of a workshop at Agile Testing Days 2022, I’m setting up a Raspberry Pi as a backup system for participants, to be prepared if things go wrong. Especially one of the first steps “Installing Ruby – If Necessary” has the potential to fail or take too long.
With the keyboard configured (see the previous post “Setting Up a Raspberry PI with a German Mac Keyboard“), the next step is installing a recent Ruby version. I’ll use rbenv , a widespread tool to manage Ruby versions on a machine.
Restarting the terminal app actually loads the updated .bashrc, and then rbenv is installed and configured.
Another step is to also install the ruby-build plugin, which rbenv uses to compile and install new Ruby versions. I’ll use git to clone this plugin and upgrade it (as documented in https://github.com/rbenv/ruby-build#readme):
~ $ time rbenv install 3.1.2
To follow progress, use 'tail -f /tmp/ruby-build.20221110172124.19039.log' or pass --verbose
No system openssl version was found, ensure openssl headers are installed (https://github.com/rbenv/ruby-build/wiki#suggested-build-environment)
Downloading openssl-3.0.7.tar.gz...
︙
As a last step set this new Ruby version to be used globally:
rbenv global 3.1.2
That’s it. Ruby 3.1.2 is now available for the user an the Raspberry Pi.
This is another entry in the ‘Note to Self’ category. 🙂 I’m sure I will need this information at some later point in time again.
The other day I wanted to have some code syntax-highlighted and be able to select the colour theme and well as use the highlighted listing in a number of ways.
Since Pygments is a library made for this task and it also provides a command line tool: pygmentize. It took me some time to use the tool the right way and produce the result I was looking for.
To show how I ended up using it, I’ll use fd as an example, a Ruby utility I wrote that dumps file contents as hex codes and utf-8 characters.
The command below is run inside a directory that contains a sub-folder ‘bin’, and inside that a (Ruby) file fd. To achieve this you can do the following (preferably when in a folder where you keep your cloned Git repositories):
full generates output that includes everything to display the colourised code. style=monokai sets the theme to ‘Monokai’. linenos=1 displays the line numbers in the output.
-o fd.html
Set the output file name.
-f html
Set the output format to HTML.
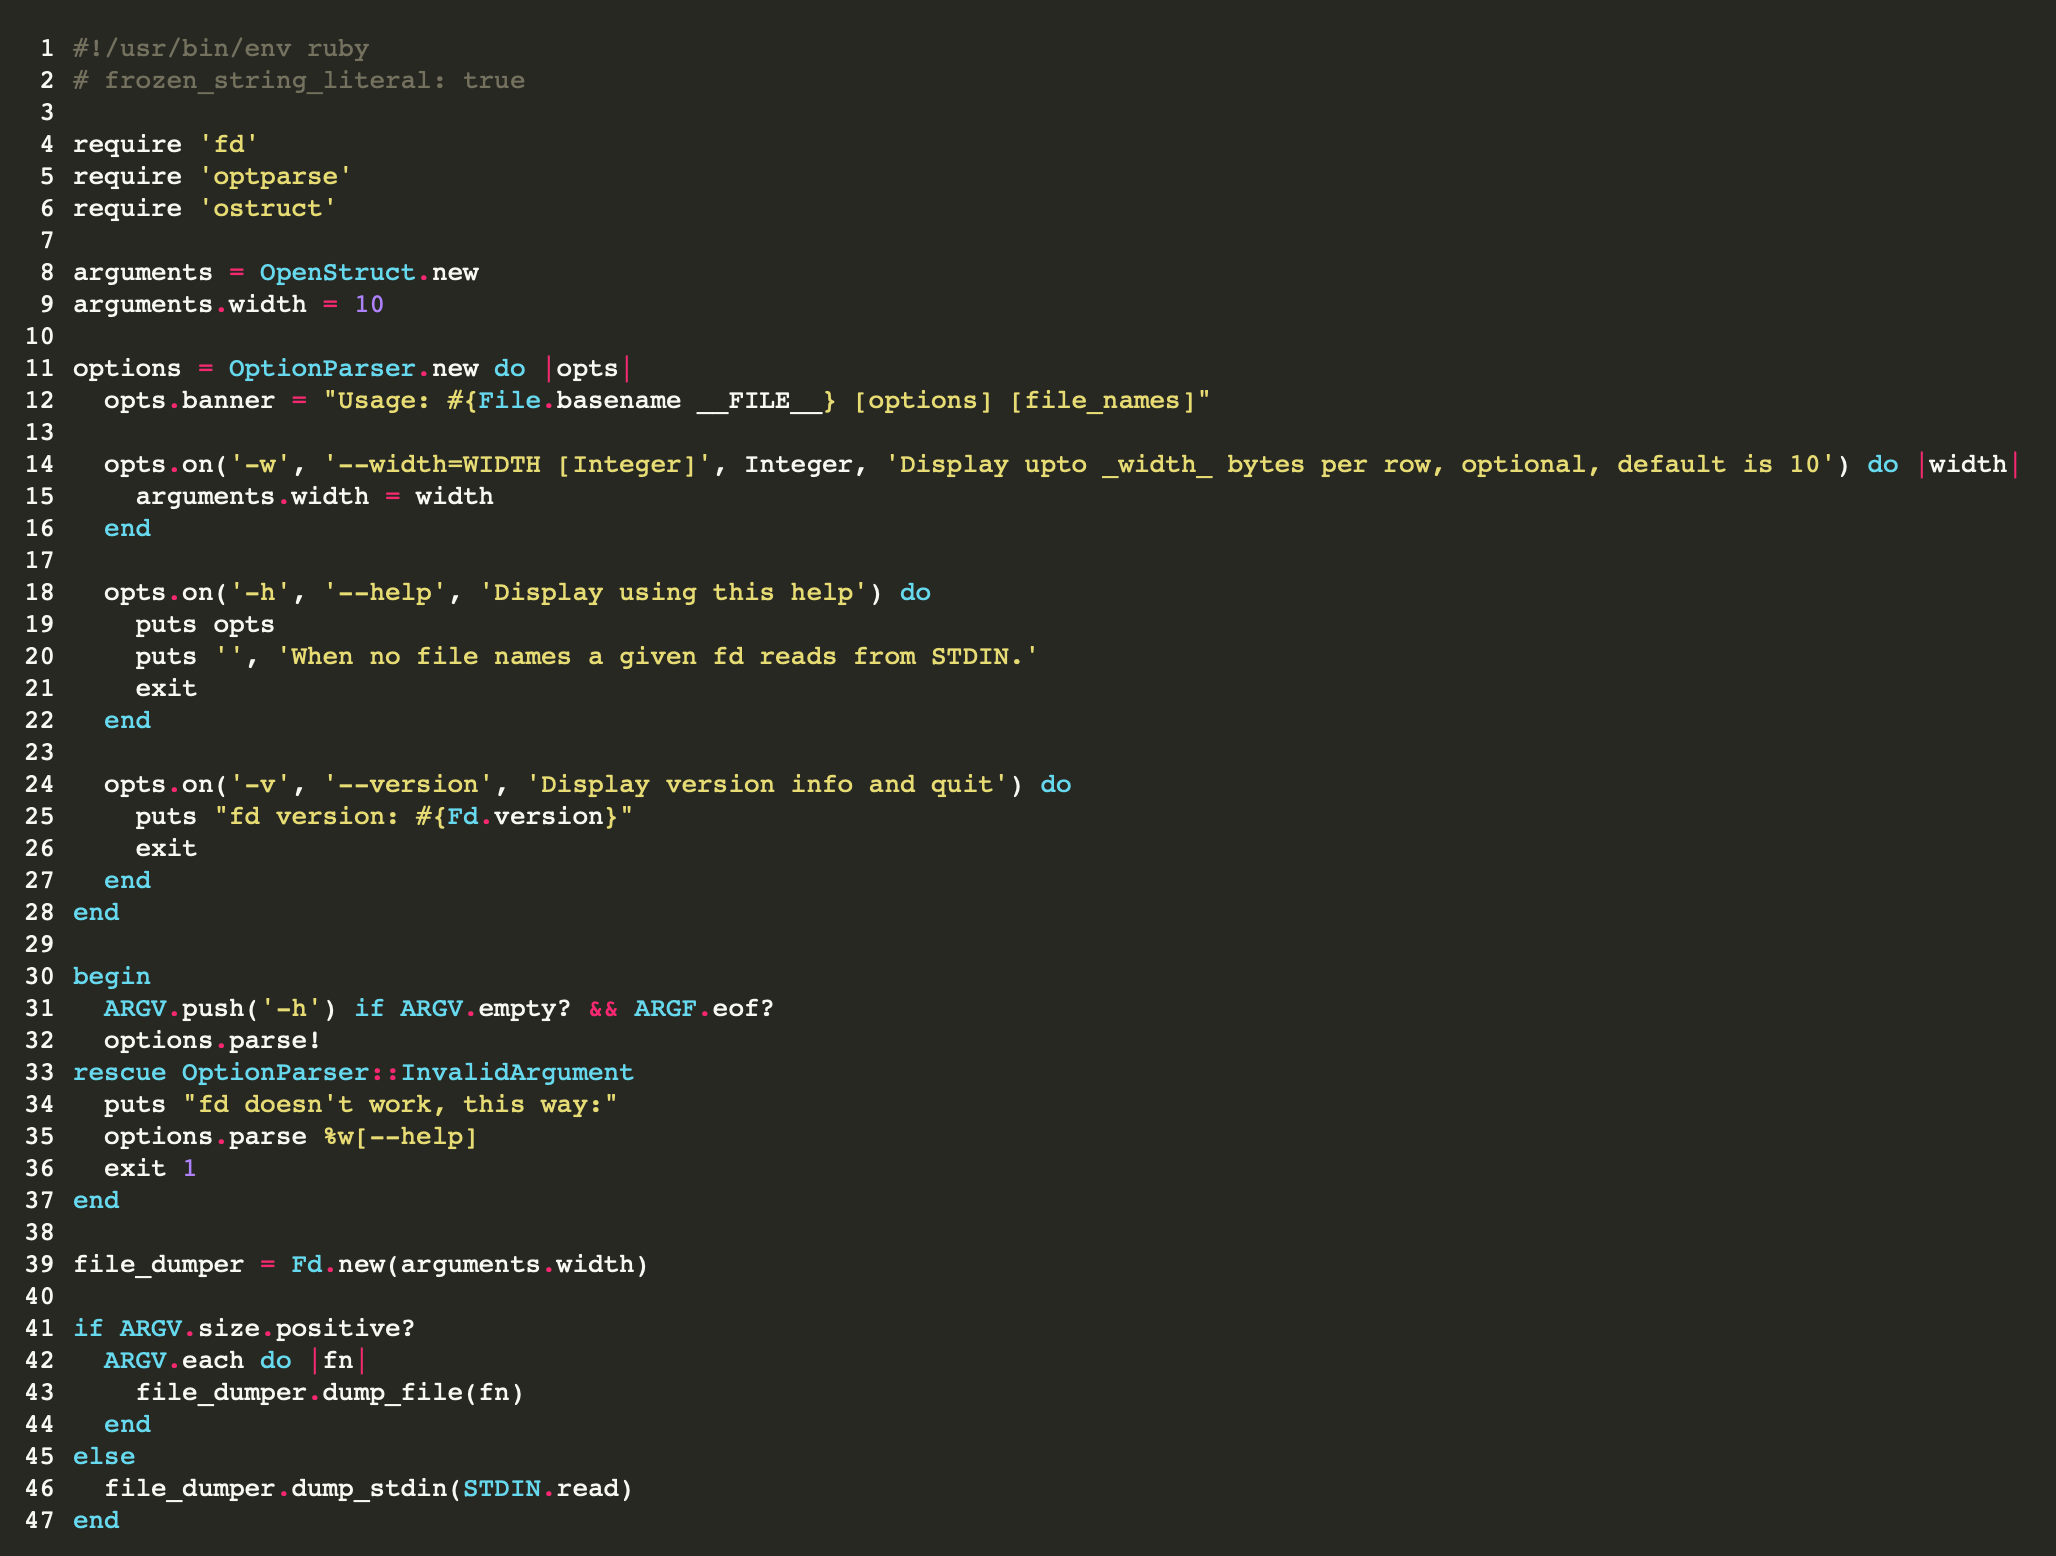
When generating HTML, the full seems to be particularly important, as otherwise the HTML won’t contain the CSS used to colour the code. The resulting highlighted code looks like this:
The pygmentized source code
In case you’d like to experiment with pygmentize, here’s some zsh code that prints a sorted list of the styles it knows about:
After a 10 year break I made it to an in-person Ruby conference again: Euruko 2022 in Helsinki. For travelling, I chose the Finnlines ferry from Travemünde to Helsinki. That’s travelling without a hurry, since each trip takes 30 hours. At the time of this writing, I’m sitting in the ship’s café looking out over the Baltic Sea into the sunshine, just south of Oland and slowly approaching and then passing Bornholm. There are worse places to write a post. 😁
Sunrise over the Baltic Sea Photo taken onboard the Finnmaid, while approaching the port of Vuosaari, Finland
Thankfully there’s a gym, a sauna (if a Finish line after all) and lots of nice places to take a seat watch the waves pass by. I even met the fist few other attendees on the ferry already!
Even before reaching Helsinki, Leo Kiisi one of the organisers, sent an invitation to join the sauna – including access to the open water. We met in the evening and had a great time as several attendees and a speaker joined. It was a fantastic way the end the first travel day, relaxing, refreshing and overall remarkable.
The opening Keynote was recorded and presented by Matz, and he busted several myths and claims that were made about Ruby. What surprised me most, is his take on type systems: He explained that (at least some) type systems are Turing compete. which means that the type system alone is already complex enough to encode any algorithm or program. 🤯 — Whether that’s desirable or not is another question. 😉
Wiktoria Dalach told us about how security aspects can be handled, by categorising the infinite space of possible issues into only thee categories:
Confidentiality: How to keep secrets secret
Integrity: How to be sure that we get what we expect
Availability: Ability to access our information always
What we’d need do do ourselves: Select the aspects from these categories that are most important to us — and them work on them.
Adarsh Pandit told us about ‘The Technical and Organizational Infrastructure of the Ruby Community’ – and drew parallels to the transportation infrastructure differences he found between California (where he lives) and Finland. I understood that the difference is mainly that in the US transportation seems to optimise the number of cars the system can handle, while in Finland it’s more the number of people and how they can get from A to B. We also learned how individuals (and companies) can support the Ruby community:
Contributing to the language implementation(s) and its libraries: The code is still being optimised, bugs a fixed etc. All think work needs to be done by someone. Thank someone could be you.
Support Ruby Central/Ruby Together with money: In the end services such as Rubygems (and its website & repositories), Bundler etc. require hardware to run on and that costs money. These projects are also improved and that involves investing time and/or money as well. BTW, you can support RubyTogether at https://rubytogether.org.
An amusing point Adarsh made: He said that Finland seems to have the happiest people and at the same time the angriest music. (Note: Finland has the highest number of mates rock bands per capita worldwide).
Vesa Vänskä explained how to move ‘From massive pull requests to trunk-based development with Ruby’ – and reminded us of Dr. Eliyahu Goldratt’s observation:
I say an hour lost at a bottleneck is an hour out of the entire system. I say an hour saved at a non-bottleneck is worthless. Bottlenecks govern both throughput and inventory.
Dr. Eliyahu Goldratt
Be sure to check out the talks on the conference site; I believe, at least some talks were recorded and will be available in the next few days. As always, I thoroughly enjoyed the conference days, meeting many new people, the great food at the lovely location.
I’m already looking forward to the next Ruby conference I’ll attend. It may be the next EURUKO and the community voted for Vilnius, Lithuania.
This is, again, is mostly a note to my future self. 🙂
Occasionally, I need to process a bunch of image files in a batch. Most often it’s about resizing them, so they fit into a given format of at most x ⨉ y pixels, or precisely into, say a square format. Here’s how I do it using ImageMagick and a bit of Ruby code:
Processing a single file
ImageMagick comes with convert (it’s linked to …/bin/magick on my machine), as command line tool for processing image files in a whole lot of ways. In order to resize a single file so that it ends up as a square image in a given number of pixels one can use the following on the command line (I use zsh on macOS):
convert input_file.jpg -resize 1200x1200 -background White -gravity center -extent 1200x1200 output_file.jpg
This command
reads ‘input_file.jpg’,
creates a new image with 1200⨉1200 pixels,
a white background,
resizes the input image as needed,
puts it in the center of the new image
and saves it as ‘output_file.jpg’.
Batch processing files
For this step, I use a Ruby script (of course this can also be done in zsh, bash, Python etc.):
images = Dir['file_pattern*.jpg']
images.each do |fn|
  `convert #{fn} -resize 1200x1200 -background White -gravity center -extent 1200x1200  #{fn.gsub(/\./, '_res.')}`
end
Tip: Be sure to use different names for the input and output file names.