This is another blog entry in the #ReminderToSelf category.
I got a new MacBook an wanted to change its hast name since I find “Stephan’s Mac” not terribly inspiring.
Since joining the Oceanography department at the University of Bremen (years, nearly two decades ago), I find ocean names are the way to go. — Even more so since I started open water swimming not that long ago.
Here’s what I tried first:
Set the name in the Mac’s system setting under “General” ➙ About:
Set it in the “Sharing” part as well:
Interestingly, that didn’t seem to be enough, the command line prompt still showed the computer’s default name.
However, there’s a command line tool that allows setting these kinds of information `scutil’:
This is another note to my future self. For a project, I wanted to address a given XML node of which I knew the name with something that resembled a path in a folder structure.
Let’s say the XML file in question is this completely contrived example in a file called ‘file.xml’:
I needed to reference a node in this file in a format like a path in the directory structure, I.e. like ‘~/tmp/somefile.txt’ for a file ‘somefile.txt’ inside ‘tmp’ in the user’s home directory.
Surprisingly, the IDEs and editors I was using displayed this information, but I couldn’t find a way to copy this to the clipboard.
I reverted to my go-to tool: Ruby (and the Nokogiri Ruby gem). In a Pry session, I only needed these steps:
Load & parse the XML file
Find the node name I was looking for
Get its parent node (and its parent elements…)
Insert the node’s name at the beginning of the list
Combine it into a String
Here’s the abbreviated Pry session:
> pry -r nokogiri
[1] pry(main)> d = Nokogiri::XML(File.open("file.xml"))
=> #(Document:0x140 {
  name = "document",
  --- 8< --- lines were cut out here --- 8< ---
[2] pry(main)> n = d.search('answer').first
=> #(Element:0x1f4 { name = "answer", children = [ #(Text "fortytwo")] })
[3] pry(main)> n.ancestors.map(&:name).unshift(n.name).reverse.join('/')
=> "document/project/test/configuration/parameters/answer"
To illustrate the topic of a workshop I’m preparing, I wrote a small Rails (7.1.1) app that uses Tailwind CSS.
While preparing the application, I wanted to tailor the CSS of buttons, tables, etc. and wondered why the layout didn’t change when I edited the CSS classes of HTML elements. While the information about the formatting was present in the HTML displayed, it did not affect how the page looked.
Here’s a tip: Write your automated tests with the failure in mind. Especially, consider a future maintainer who may need a useful error message.
This can help when the test fails in the future (and it probably will). A descriptive message helps understand the technical issue you’re looking at and will ideally guide you to finding a solution.
Let’s look at some examples that leave something to be desired. These messages may be true, but don’t help to understand the underlying problem:
Expected true, but got false
The result message is malformed
fail
Yes, I have seen these or very similar messages, that are rather useless.
Imagine how much more helpful, the following messages are:
Expected condition XY to be true in context AB of object O
The message ‘<output the actual message>’, is malformed and cannot be processed further
Got <actual result> instead of <expected_result> when processing XY
These improved messages can guide you, help you remember the context and figure out the underlying issue when the test fails.
I find that this improvement shortens the time spent with failure analysis. It makes my days more productive because I get a message that tells me about the context where thing went wrong.
Do you have similar ideas about how to improve (automated) tests? I’d love to hear about them.
In preparation of a workshop at Agile Testing Days 2022, I’m setting up a Raspberry Pi as a backup system for participants, to be prepared if things go wrong. Especially one of the first steps “Installing Ruby – If Necessary” has the potential to fail or take too long.
With the keyboard configured (see the previous post “Setting Up a Raspberry PI with a German Mac Keyboard“), the next step is installing a recent Ruby version. I’ll use rbenv , a widespread tool to manage Ruby versions on a machine.
Restarting the terminal app actually loads the updated .bashrc, and then rbenv is installed and configured.
Another step is to also install the ruby-build plugin, which rbenv uses to compile and install new Ruby versions. I’ll use git to clone this plugin and upgrade it (as documented in https://github.com/rbenv/ruby-build#readme):
~ $ time rbenv install 3.1.2
To follow progress, use 'tail -f /tmp/ruby-build.20221110172124.19039.log' or pass --verbose
No system openssl version was found, ensure openssl headers are installed (https://github.com/rbenv/ruby-build/wiki#suggested-build-environment)
Downloading openssl-3.0.7.tar.gz...
︙
As a last step set this new Ruby version to be used globally:
rbenv global 3.1.2
That’s it. Ruby 3.1.2 is now available for the user an the Raspberry Pi.
For a workshop I will present at the Agile Testing Days 2022, I’ve set up a backup computer, in case folks don’t have Ruby installed on their machine already, or don’t get it installed within the available time slot.
The Raspberry itself had already worked … with some keyboard back in 2017 (when I used it in a ½ days tutorial at the same conference). But now, I connected a Mac keyboard to it, one with a German layout – including the umlauts. Getting the configuration to work well enough was surprisingly hard.
The existing keyboard configuration didn’t work very well, since it expected an international layout, meaning that the key cap labels weren’t always correct. Or the printed key wasn’t, depending on your perspective.
Setting it up using the GUI application that comes with RaspbianOS didn’t work so well either: for some configuration settings the keyboard stopped reacting completely. Yay! I learned another way how not do do it. 🤣
In the end I used the terminal raspi-config:
sudo raspi-config
to try all variations of (non-japanese) Apple keyboards with the corresponding German layouts and variants.
In the end I settled with this configuration, as it is stored in /etc/default/keyboard on the Raspi:
This is another entry in the ‘Note to Self’ category. 🙂 I’m sure I will need this information at some later point in time again.
The other day I wanted to have some code syntax-highlighted and be able to select the colour theme and well as use the highlighted listing in a number of ways.
Since Pygments is a library made for this task and it also provides a command line tool: pygmentize. It took me some time to use the tool the right way and produce the result I was looking for.
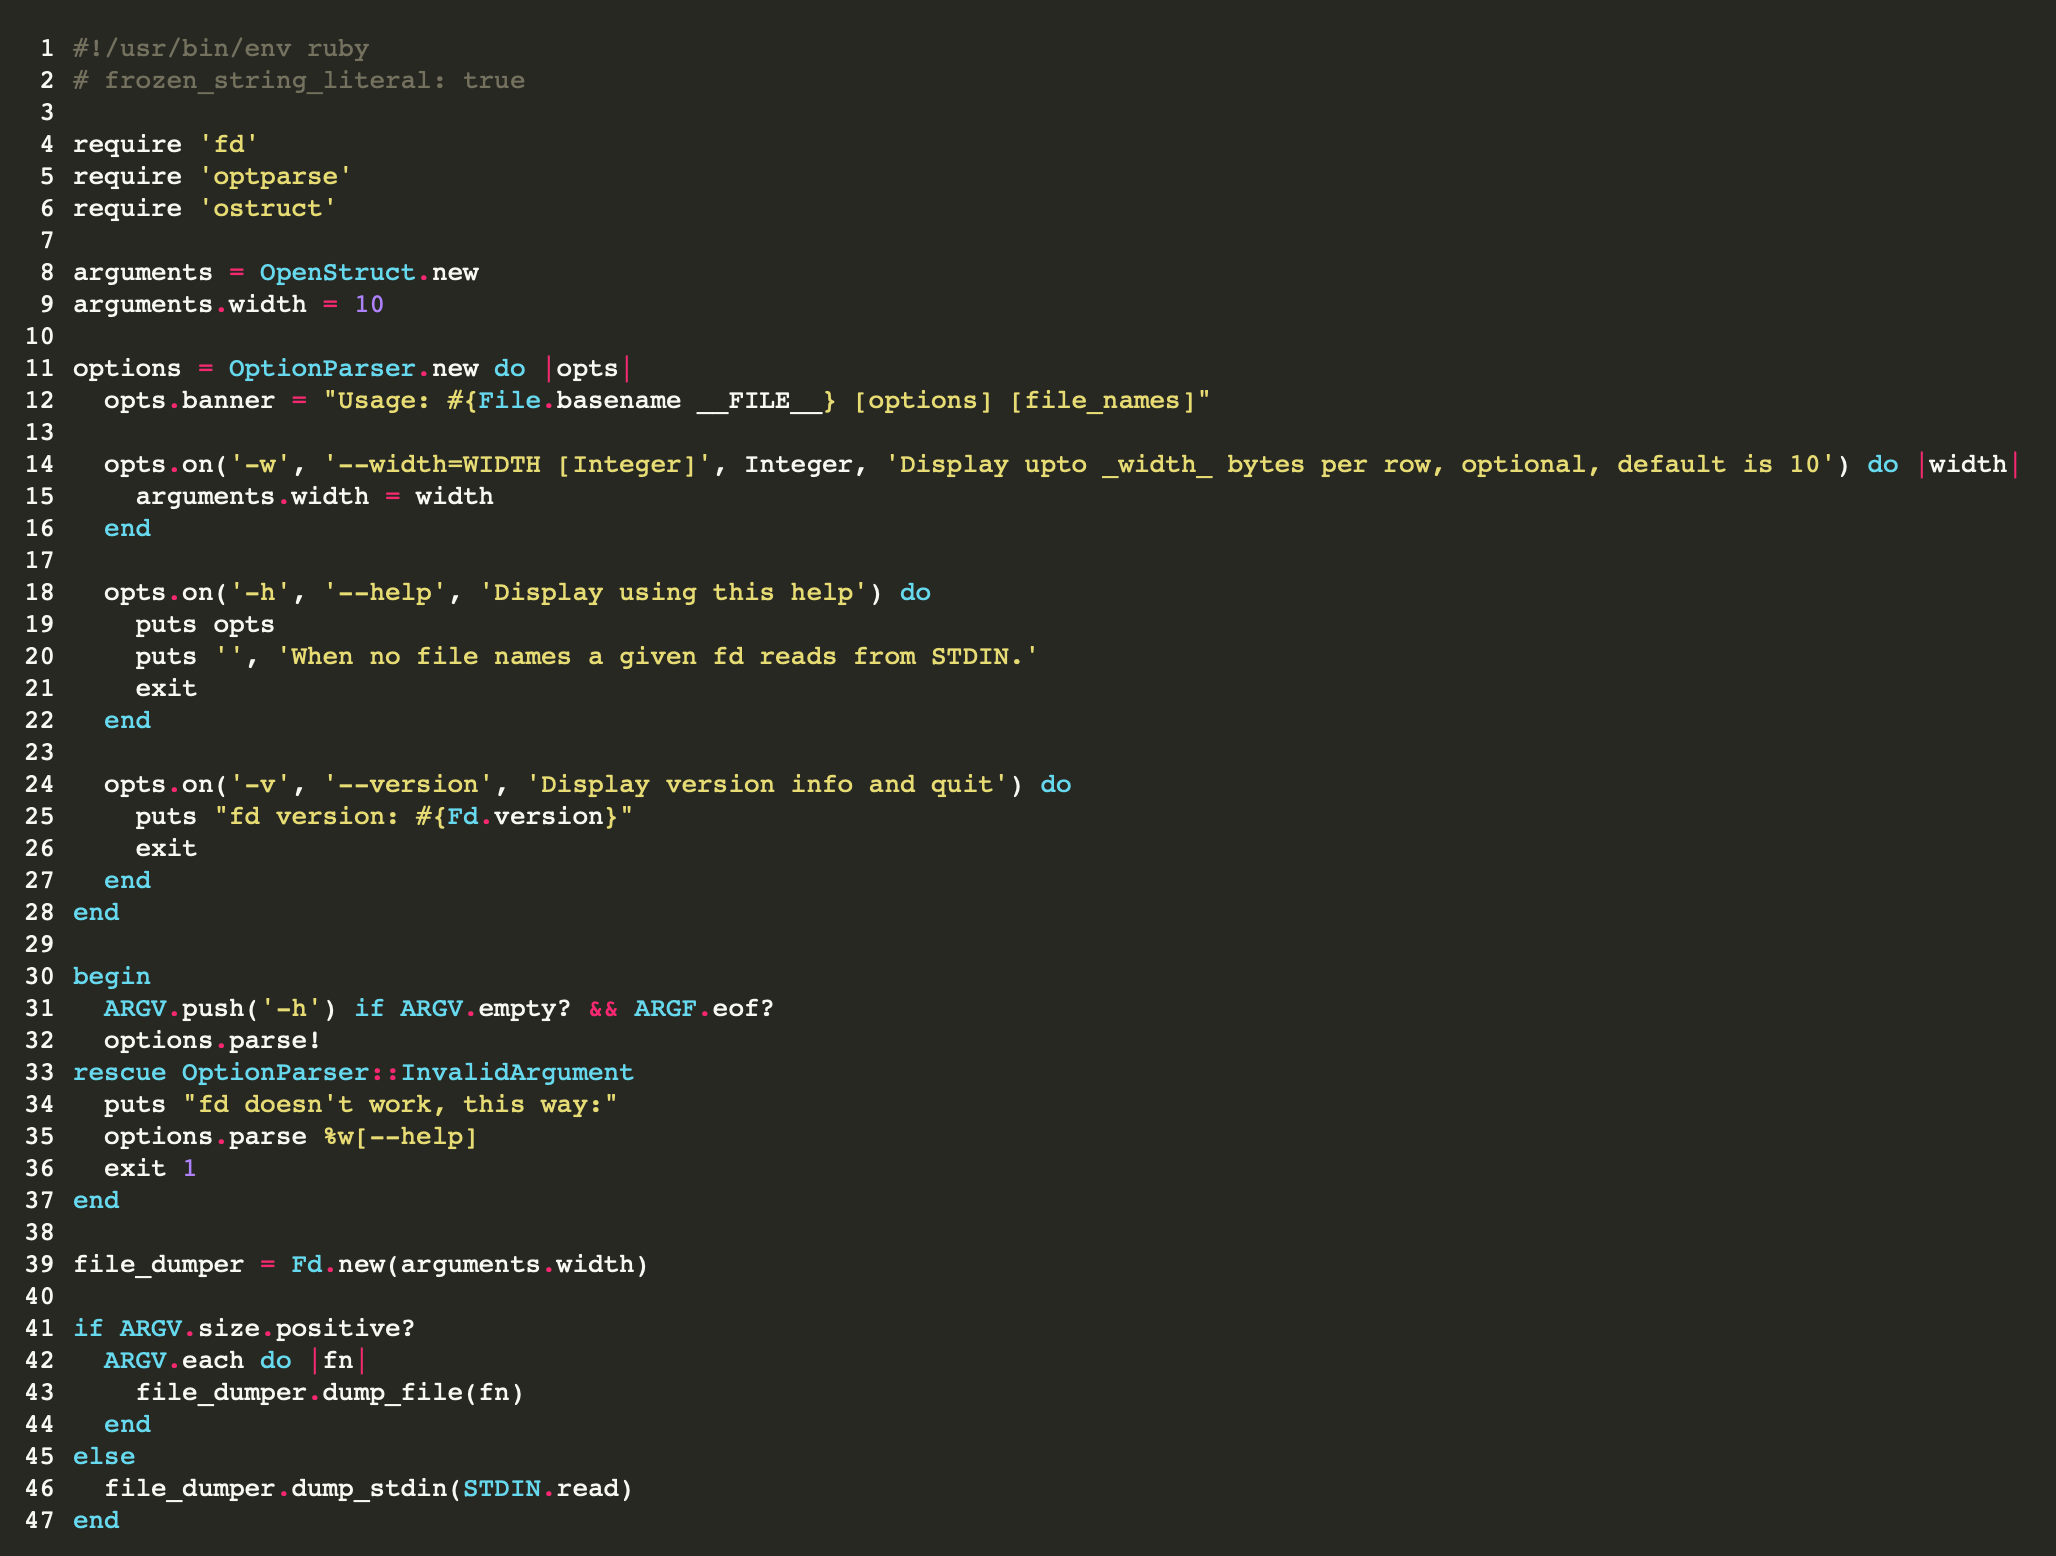
To show how I ended up using it, I’ll use fd as an example, a Ruby utility I wrote that dumps file contents as hex codes and utf-8 characters.
The command below is run inside a directory that contains a sub-folder ‘bin’, and inside that a (Ruby) file fd. To achieve this you can do the following (preferably when in a folder where you keep your cloned Git repositories):
full generates output that includes everything to display the colourised code. style=monokai sets the theme to ‘Monokai’. linenos=1 displays the line numbers in the output.
-o fd.html
Set the output file name.
-f html
Set the output format to HTML.
When generating HTML, the full seems to be particularly important, as otherwise the HTML won’t contain the CSS used to colour the code. The resulting highlighted code looks like this:
The pygmentized source code
In case you’d like to experiment with pygmentize, here’s some zsh code that prints a sorted list of the styles it knows about: